Creating Navigation Component Hover Menus: Difference between revisions
No edit summary |
No edit summary |
||
| (5 intermediate revisions by 2 users not shown) | |||
| Line 1: | Line 1: | ||
To further customize the content within a [[NavigationComponent | Navigation Component]], you can create Navigation Component Hover Menus! | To further customize the content within a [[NavigationComponent | Navigation Component]], you can create Navigation Component Hover Menus! ''Note: this is now possible via the [[Managing Primary Navigation | Primary Navigation]] area if you are looking to add dropdown menus for this area specifically.'' | ||
[[Image:Hovernav.PNG]] | [[Image:Hovernav.PNG]] | ||
<div class="note"> | |||
''Note | '''Note''' <br /> | ||
This works only with nested sub-menus created within the Navigation Component. | |||
</div> | |||
| Line 37: | Line 39: | ||
1. Click the [[Collapse Components | collapse component]] button in the | 1. Click the [[Collapse Components | collapse component]] button in the website builder [[Toolbar]], so that the components ID are displayed.<br> | ||
2. Select and copy the ID into your clipboard (it should look similar to #component_0000)<br> | 2. Select and copy the ID into your clipboard (it should look similar to #component_0000)<br> | ||
3. Go to the My Website [[toolbar]] menu, and click on [[Editing Theme Source Code | Edit Theme Source Code]].<br> | 3. Go to the My Website [[toolbar]] menu, and click on [[Editing Theme Source Code | Edit Theme Source Code]].<br> | ||
| Line 52: | Line 54: | ||
6. The second line of the above code needs to have #component_0000 replaced with whatever you copied as the components CSS ID.<br> | 6. The second line of the above code needs to have #component_0000 replaced with whatever you copied as the components CSS ID.<br> | ||
7. Click the Save button at the bottom of the dialog. | 7. Click the Save button at the bottom of the dialog. | ||
Superfish also has a variety of options that can be tweaked. A list of these options are available on the [http://users.tpg.com.au/j_birch/plugins/superfish/#options Superfish documentation page]. | Superfish also has a variety of options that can be tweaked. A list of these options are available on the [http://users.tpg.com.au/j_birch/plugins/superfish/#options Superfish documentation page]. | ||
<div class="note"> | |||
'''Note''' <br /> | |||
Group labels can also be edited to link to internal pages. | |||
</div> | |||
====Example:==== | ====Example:==== | ||
An example of this can be viewed on the [http:// | An example of this can be viewed on the [http://builderexample.com/web-tools Web Tools] page of http://builderexample.com | ||
[[Category:Tips and Tricks]] | [[Category:Tips and Tricks]] | ||
Latest revision as of 08:20, 30 April 2013
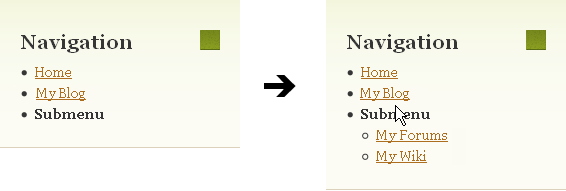
To further customize the content within a Navigation Component, you can create Navigation Component Hover Menus! Note: this is now possible via the Primary Navigation area if you are looking to add dropdown menus for this area specifically.
Note
This works only with nested sub-menus created within the Navigation Component.
In order to activate the hover menus for all of your navigation components you'll need to follow the directions below:
1. Go to the My Website toolbar menu, and click on Edit Theme Source Code.
2. Click on the default.html in the table that lists your theme files.
3. Add the following code below code inside of the <head> element:
<script type="text/javascript" src="/extras/js/superfish.js"></script>
<script type="text/javascript"> $j(function(){ $j("ul.navigation").superfish() });</script>
4. Click the Save button at the bottom of the dialog.
The page should reload and any nested menus in your Navigation Component will now be activated when the mouse hovers overtop of the label.
If you just want the hover menu activated on one specific Navigation Component, you'll first need to get the CSS ID of the component. To do this, you'll need to:
1. Click the collapse component button in the website builder Toolbar, so that the components ID are displayed.
2. Select and copy the ID into your clipboard (it should look similar to #component_0000)
3. Go to the My Website toolbar menu, and click on Edit Theme Source Code.
4. Click on the default.html in the table that lists your theme files.
5. You'll now need to add the following code inside of the <head> element:
<script type="text/javascript" src="/extras/js/superfish.js"></script>
<script type="text/javascript"> $j(function(){ $j("#component_0000 .navigation").superfish() });</script>
6. The second line of the above code needs to have #component_0000 replaced with whatever you copied as the components CSS ID.
7. Click the Save button at the bottom of the dialog.
Superfish also has a variety of options that can be tweaked. A list of these options are available on the Superfish documentation page.
Note
Group labels can also be edited to link to internal pages.
Example:
An example of this can be viewed on the Web Tools page of http://builderexample.com

